 Call us now:

How to Install PS1 and PS2 BIOS Files on Your Emulator
PlayStation emulation usually becomes much easier once the correct BIOS file is placed in the right folder and selected by the emulator. Whether you are setting up a PS1 BIOS for a PlayStation emulator or a PS2 BIOS for PCSX2, the basic idea is the same: obtain a valid BIOS from hardware you own, save it in a location the emulator can access, and then tell the emulator where to look for it.
A BIOS is not the game itself. It is firmware that helps an emulator reproduce parts of the original console system. Some emulators can use an emulated BIOS or HLE option, while others work better or require a real BIOS dump. Libretro explains that BIOS files are copies of system software used by the hardware being emulated, and that their exact requirements depend on the emulator core.
This guide explains how to install PS1 BIOS, PS2 BIOS, and general PS BIOS files on popular emulators. The menu names may differ slightly between versions, but the process stays quite similar.
What Is a PS BIOS File?
Before installing anything, it helps to understand what a PS BIOS actually does.
BIOS stands for Basic Input/Output System. On an original PlayStation console, the BIOS is part of the system firmware stored in the console. An emulator uses a BIOS image to reproduce functions that the original hardware would normally perform.
That means a BIOS is different from a game file.
A simple way to think about it is:
- PS1 BIOS = firmware from a PlayStation 1
- PS2 BIOS = firmware from a PlayStation 2
- PS BIOS = a broad term people may use when talking about PlayStation BIOS files
A PS1 emulator cannot use a PS2 BIOS as a replacement. In the same way, a PS2 emulator such as PCSX2 needs an appropriate PS2 BIOS.
BIOS requirements can also change depending on the emulator. For example, the current Libretro documentation lists different BIOS requirements for Beetle PSX, PCSX ReARMed, and PS2 cores.
Before You Install a PS1 or PS2 BIOS
There is one point you should understand before working with BIOS files.
A BIOS is copyrighted proprietary software. The safest approach is to create a BIOS dump from a PlayStation console that you own and then use that dump with your emulator. PCSX2’s official documentation specifically says its BIOS files are proprietary and should be dumped from your own PS2. DuckStation’s current setup code also tells users to obtain a BIOS from an actual PS1 or PS2 unit they own.
You should also keep a backup of your original BIOS dump. If an emulator stops detecting the file later, having an untouched backup can save time.
Check These Things First
Before opening the emulator, make sure:
- You have a valid BIOS dump for the console you are emulating.
- The file is extracted if it came in an archive.
- You know whether you are setting up a PS1 BIOS or PS2 BIOS.
- You know which emulator you are using.
- You know where that emulator looks for BIOS files.
Do not rename files randomly just to make them work. Some emulator cores look for specific names, while others can detect a BIOS based on its contents or other supported filenames.
How to Install a PS1 BIOS
Installing a PS1 BIOS is normally straightforward. DuckStation is a popular modern choice for PlayStation 1 emulation, while RetroArch supports several PlayStation cores with their own BIOS requirements.
Step 1: Prepare Your PS1 BIOS File
First, locate the BIOS dump on your computer.
If it is inside a ZIP or another archive, extract it before trying to use it unless your specific emulator says otherwise.
Do not keep several unrelated BIOS files mixed together while troubleshooting. It is easier to confirm a setup when you know exactly which files belong to your PS1 system.
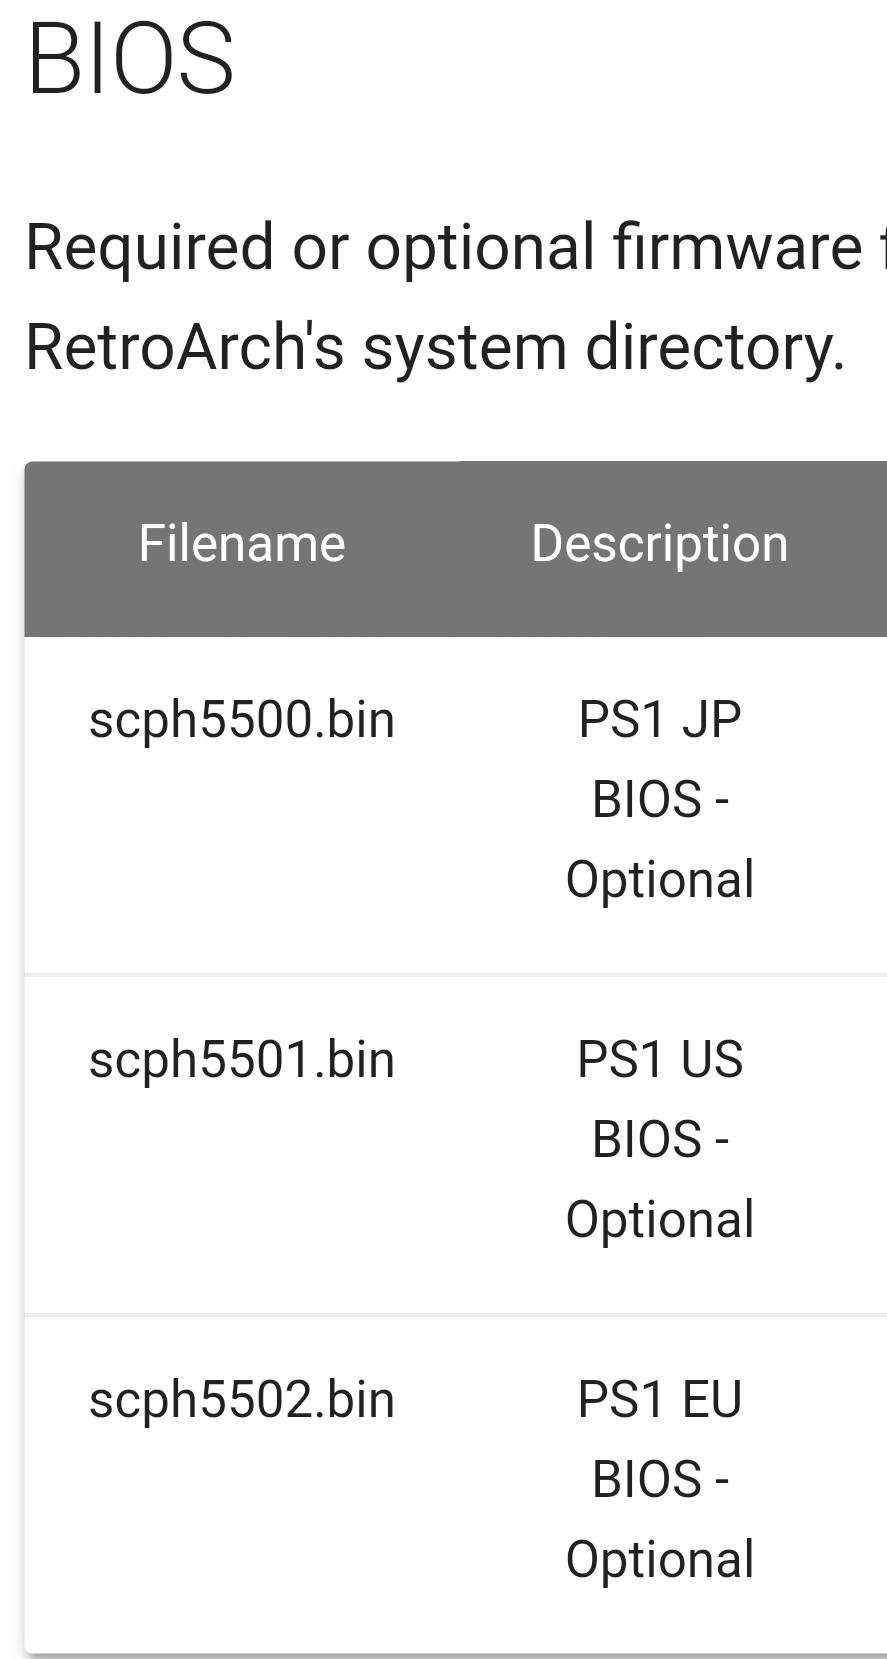
Some RetroArch cores use names such as:
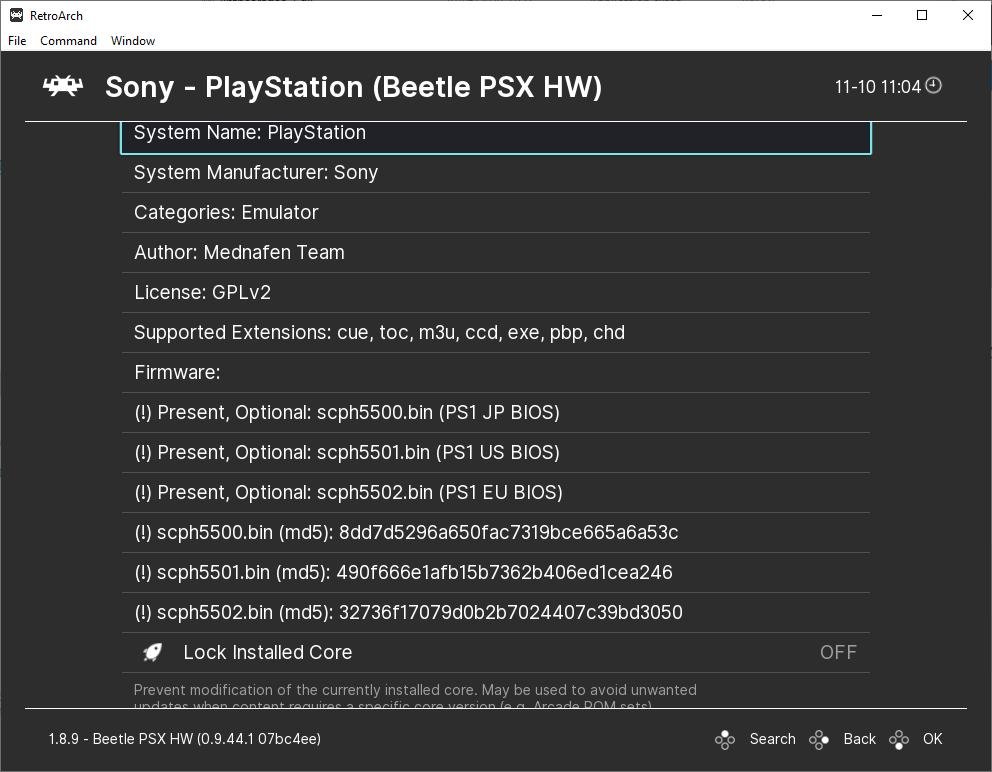
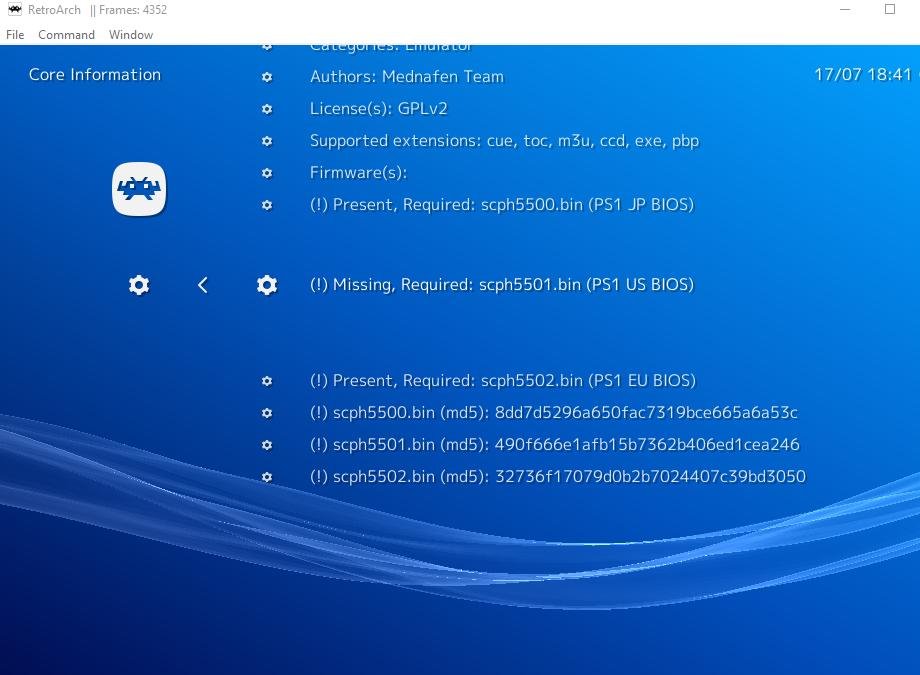
scph5500.binfor Japanscph5501.binfor the USscph5502.binfor Europe
The exact BIOS supported depends on the core. The official Libretro documentation lists these files and their MD5 hashes for Beetle PSX.
Step 2: Create a BIOS Folder
Create a simple folder somewhere you can easily find it.
For example:
C:\Emulators\PS1\BIOS\
You can use another location. The important part is that you remember the folder path.
Keeping BIOS files in their own folder is useful because it avoids confusion with game files, save files, memory cards, and emulator settings.
Step 3: Open Your PS1 Emulator
Start your PlayStation emulator.
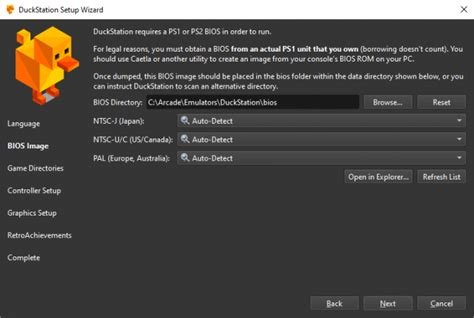
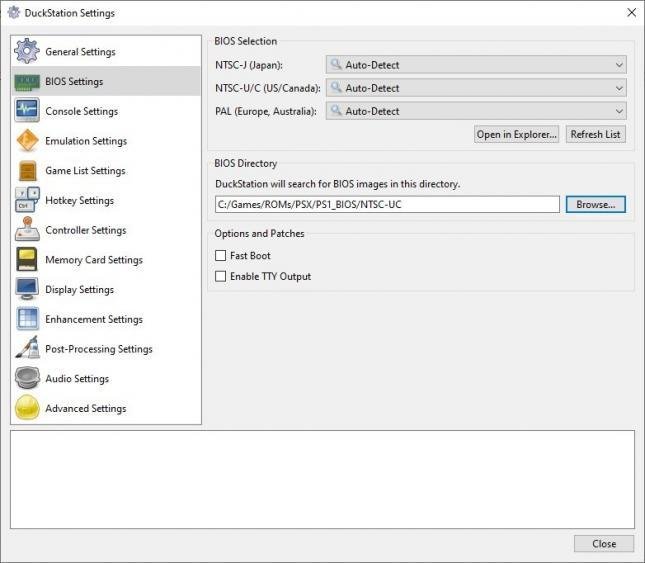
If you are using DuckStation, open the setup wizard or go into its BIOS settings. The current DuckStation interface contains a dedicated BIOS section, an Install BIOS option, and a BIOS directory setting. It can also list BIOS files by region.
Step 4: Select the BIOS Directory
Look for an option such as:
BIOS Directory
BIOS Path
Install BIOS
BIOS Settings
Select the folder where your PS1 BIOS file is stored.
In DuckStation, the BIOS settings allow you to select the BIOS directory and identify regional BIOS entries such as NTSC-J, NTSC-U/C, and PAL.
After selecting the folder, use Refresh List if the emulator provides that option.
Step 5: Select the Correct BIOS
Once the emulator scans the folder, your PS1 BIOS should appear.
Choose the appropriate BIOS for your game region when the emulator gives you that option. For example, a Japanese game may work best with the Japanese BIOS, while a European release can use a PAL BIOS.
Some modern PS1 cores are more flexible than older setups. Libretro’s Beetle PSX documentation lists specific regional BIOS files and also supports other compatible options.
Step 6: Save the Settings
Apply your settings and close the BIOS window.
Then start a game.
If the emulator detects the BIOS correctly, the game should continue into the normal startup process instead of showing a missing-BIOS message.
How to Install a PS2 BIOS in PCSX2
The PS2 BIOS setup in PCSX2 follows the same basic pattern, but there is one major difference: PCSX2 requires a BIOS to run PlayStation 2 games. Its official documentation states that there is currently no open-source BIOS alternative for PCSX2 and directs users to dump the BIOS from their own PS2 console.
Step 1: Prepare Your PS2 BIOS Dump
After creating your BIOS dump from your own console, copy the resulting files to your PC.
Keep the original dump untouched.
Depending on the console and dumping method, you may see files with extensions such as .rom0, .rom1, .nvm, or related files. PCSX2’s official BIOS dumping guide explains that the resulting files can include several components.
Step 2: Create a Dedicated BIOS Folder
A simple example is:
C:\Emulators\PCSX2\BIOS\
You can use another location, including an external drive.
The folder does not need to have that exact name. What matters is that PCSX2 is pointed to the correct folder.
Step 3: Open PCSX2 Settings
Launch PCSX2 and open its settings.
The current PCSX2 documentation separates setup, configuration, troubleshooting, and advanced options, making it easier to work through the initial setup before changing advanced settings.
Find the BIOS section or the location where PCSX2 asks you to select the BIOS directory.
Step 4: Point PCSX2 to the BIOS Folder
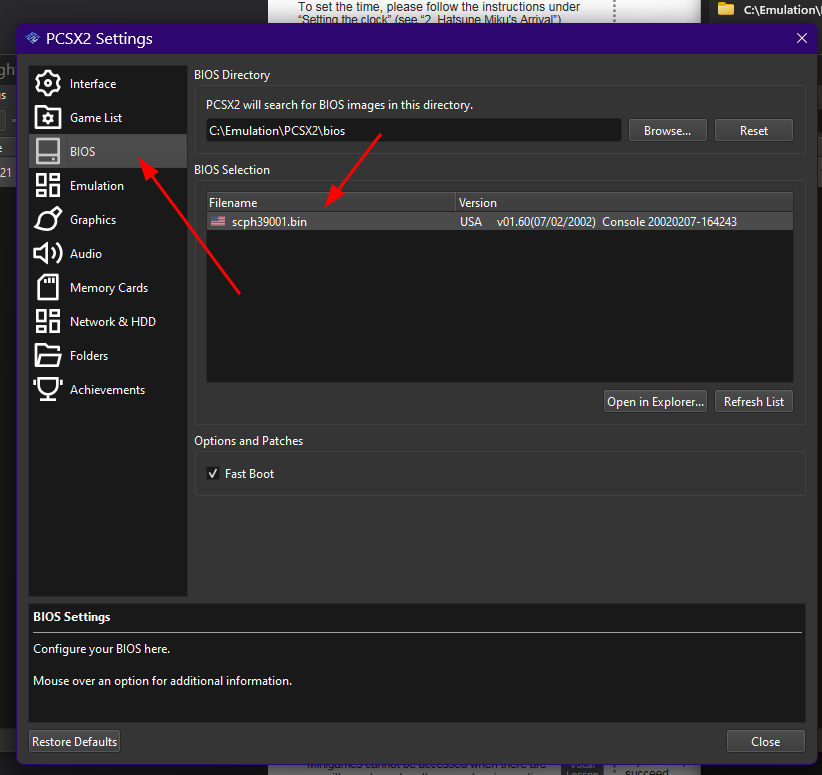
Use the Browse button or the BIOS directory field and select the folder containing your PS2 BIOS dump.
If PCSX2 is already pointed to the correct folder, you should see the BIOS files in its selection area.
If the BIOS list is empty, check the folder path first. A wrong path is one of the most common reasons an emulator does not detect a BIOS.
Step 5: Let PCSX2 Scan the BIOS
After selecting the correct directory, allow PCSX2 to scan the contents.
The available BIOS entries should appear in the emulator.
If more than one BIOS is available, you may be able to choose which one PCSX2 uses. Exact options can depend on the BIOS dump and PCSX2 version.
Avoid changing advanced settings until the basic BIOS setup is working.
Step 6: Start Your PS2 Game
Once PCSX2 recognizes the BIOS, return to the main game list and launch a game you have legally dumped from your own disc.
If the game boots, the BIOS setup is working.
If the emulator still reports that a BIOS is missing, go through the troubleshooting section below before changing other settings.
How to Install PS BIOS in RetroArch
RetroArch is slightly different because it uses emulator cores. The BIOS requirement depends on the core you choose.
For PlayStation 1, popular cores include Beetle PSX, Beetle PSX HW, and PCSX ReARMed. The BIOS path is commonly linked to RetroArch’s system directory. Libretro’s documentation states that BIOS files normally go into the RetroArch system directory, although users should check the documentation for the specific core.
Find the RetroArch System Folder
Open:
Settings → Directory → System/BIOS
The exact interface can vary slightly by platform and RetroArch version.
For a PS1 core, place the required BIOS files in the directory expected by that core.
For example, Beetle PSX documentation lists its supported BIOS files and says they belong in the frontend’s system directory.
Check Core Requirements
This step matters because not every PlayStation core handles BIOS files in exactly the same way.
For example, Beetle PSX supports user-supplied BIOS files, while PCSX ReARMed can fall back to an HLE BIOS when compatible firmware is not available. Libretro notes that HLE can have lower compatibility in some situations.
So, if a PS BIOS works with one RetroArch core but not another, check that core’s BIOS documentation rather than assuming the files are broken.
PS1 BIOS vs PS2 BIOS: Do They Work Together?
No.
A PS1 BIOS and PS2 BIOS are different firmware from different PlayStation systems. A PS1 emulator expects PlayStation 1 firmware, while PCSX2 expects PlayStation 2 firmware.
You should keep them in separate folders to avoid mistakes.
For example:
Emulators/
├── PS1/
│   └── BIOS/
└── PS2/
    └── BIOS/
This also makes future backups much easier.
A general PS BIOS folder can be useful if you manage multiple systems, but separate folders are usually cleaner and less confusing.
What Does BIOS Region Mean?
You may see terms such as:
- NTSC-J
- NTSC-U/C
- PAL
These describe different regional standards used by PlayStation systems and games.
For PS1, Libretro documents separate Japanese, US, and European BIOS files for Beetle PSX.
For many modern emulators, region handling is more flexible than it was on original hardware. PCSX2’s Libretro core documentation, for example, says that region locking is not implemented in that core, although settings such as Fast Boot can affect how the BIOS behaves.
For a simple setup, use a BIOS that is appropriate for your game and emulator whenever practical. This reduces unnecessary compatibility problems.
Common PS BIOS Installation Problems
Even when the emulator is installed correctly, BIOS detection can fail.
BIOS Is Not Showing
First, check the folder path.
Make sure the emulator is looking at the folder where your BIOS file actually exists.
Do not assume that placing a file somewhere on the computer is enough. The emulator needs permission and the correct path.
BIOS Is Still Compressed
Some emulators require BIOS files to be extracted. For example, Libretro’s PS2 documentation explicitly says the BIOS must be extracted and will not be detected while zipped.
If your BIOS is inside a ZIP, RAR, or 7Z archive, extract it and try again.
Wrong BIOS Type
A PS2 emulator cannot use a PS1 BIOS.
Likewise, a PS1 emulator cannot simply use a PS2 BIOS because both files contain the word “PlayStation.”
Always confirm which console the emulator is emulating.
BIOS Filename Is Wrong
Some emulator cores look for specific filenames.
The official Beetle PSX documentation, for example, lists exact supported filenames such as scph5500.bin, scph5501.bin, and scph5502.bin.
Do not rename a file based only on a filename you saw online. Check the BIOS requirements for your specific emulator core.
BIOS Works but the Game Does Not Boot
A BIOS problem is not always the real problem.
Your game image may have an incorrect format, missing files, or a damaged dump.
For PS1, some RetroArch cores require a .cue file that correctly points to the game’s disc image. Libretro’s Beetle PSX documentation explains that the cue sheet describes how tracks are laid out on the disc image.
That means a correct BIOS alone does not guarantee that every game image will start.
How to Check if Your BIOS Is Healthy
If you have dumped your own BIOS, checking its hash can help confirm that the file was transferred correctly.
PCSX2’s official documentation explains that users can verify their BIOS dump using SHA-1 hashes and compare the result with known-good BIOS data.
On Windows, one simple method is PowerShell:
Get-FileHash "C:\path\to\your\bios\file" -Algorithm SHA1On macOS:
shasum "path/to/your/bios/file"On Linux:
sha1sum "path/to/your/bios/file"The exact verification method can depend on the emulator and the BIOS version, so use the relevant documentation when checking a dump.
Should You Use One BIOS File for Every Emulator?
Not always.
Different emulators and cores can have different BIOS requirements.
A PS1 BIOS that works with one core may not be the preferred option for another. The same applies to PS2 emulation.
RetroArch is a good example because several PlayStation cores are available, each with its own documented BIOS behavior.
The better approach is simple:
Check the BIOS requirements of the emulator you are using first.
Then place the correct BIOS in the directory that emulator expects.
Tips for a Clean PS BIOS Setup
Keep your setup simple from the start.
Use separate folders for PS1 and PS2. Keep backup copies of your original dumps. Avoid changing BIOS filenames unless your emulator documentation tells you to. Do not mix game files and firmware files in one large folder.
It is also a good idea to write down which BIOS belongs to which console and region. This becomes useful if you later install RetroArch, DuckStation, PCSX2, or another emulator on a second computer.
When troubleshooting, change one thing at a time. For example, first check the BIOS path. Then check whether the emulator detects the file. Only after that should you change region or advanced emulator settings.
Frequently Asked Questions
What is the difference between PS1 BIOS and PS2 BIOS?
A PS1 BIOS is firmware from the original PlayStation, while a PS2 BIOS is firmware from the PlayStation 2. They are not interchangeable.
What does PS BIOS mean?
PS BIOS is a broad phrase that can refer to PlayStation BIOS files. Because “PS” can mean different PlayStation generations, it is better to specify PS1 BIOS or PS2 BIOS when explaining a setup.
Where should I put a PS1 BIOS?
The location depends on your emulator. DuckStation lets you configure a BIOS directory, while RetroArch commonly uses its system directory for core firmware.
Where does PCSX2 look for a PS2 BIOS?
PCSX2 needs to be pointed to the directory containing your PS2 BIOS dump. The exact interface depends on the PCSX2 version, but the setup process is based around selecting and detecting the BIOS files.
Do I need a BIOS for PS1 emulation?
It depends on the emulator and core. Some PlayStation cores can use an HLE BIOS or built-in alternative, while others work with or require a real BIOS. Beetle PSX, for example, documents user-supplied BIOS support, while PCSX ReARMed can fall back to HLE with reduced compatibility in some cases.
Can I use a PS1 BIOS in PCSX2?
No. PCSX2 is a PlayStation 2 emulator and needs a compatible PS2 BIOS.